If you missed Maximus/HSC-III’s absolutely outstanding Laser Practice…Laser Perfection idea in Part Seven of this series, I would invite you to discover one of the most significant practice-session improvement concepts that I have ever used.
Following on the heels of that excellent idea, Maximus, Jeffrey47, and I discussed some additional practice-session uses for the laser-level that further extends its function and efficacy. We’ve also added some bonus material that may help to elevate your game to the next level…and to the level beyond that one too.
Let’s jump right into the discussion:
Another Laser-Perfection Idea
Maximus:
I like using the line that the laser emits to determine exactly how straight my landing-zone runway is when I compare where I launch the dice from, to where they first impact the backwall.
Mad Professor:
Yeah, that’s a great idea. By using the laser to shine a red line on your throwing-lane and the backwall in relation to where you swing your arm and release the dice from, you can tell ahead of time if the dice are going to hit SQUARE or be OFF-of-square when they impact the backwall. It is also a great way to determine whether the impact-point on the backwall (where the dice will be hitting) is indeed flat, or whether that portion of the wall is still transitioning out of the rounded-corner curve.
This kind of throwing-lane alignment verification is especially relevant when you use the white Pass-line markings on the table. If the line itself is misaligned or the extension of that reference-line actually intersects the backwall where it is still imperceptibly curved; then the dice-impact with the backwall is obviously going to be unsquare. Using the laser to ensure that your throwing-lane is not only straight, but that the dice are also intersecting the backwall squarely, is of utmost importance.
Jeffrey47:
When we watch our arm and hand motion, the geometry we see from the perspective of our eyes in our heads is necessarily totally screwed up because we are looking at the table, the wall, our arm, the dice…everything, from an oblique (slanting) angle. As a result, nothing we “see” conforms to our natural expectations for geometric “order.”
- For example, at the end of a proper toss-motion, our hand appears to our eye’s oblique viewpoint to have shifted to the inside of the table, as you view through (by extending your gaze) to the backwall. I think we wrongly tend to try to “correct” for this illusion, by bringing our arm toward us. Is it any wonder that our ability to maintain consistent forward-motion that doesn’t veer off track is a repeatedly hit-and-miss proposition?
Without the laser training tool, we’re learning to toss only within a RANGE of relative alignment, but not being trained to maintain the kind of properly-aligned perfection that Maximus and MP are talking about.
Mad Professor:
That is one of the reasons why I seized on Maximus’ idea in the first place. His Laser Practice…Laser Perfection idea had an immediate and direct impact on my shooting consistency right from the get-go.
As Jeff just mentioned, most players only learn to toss within a highly-variable range of being truly and squarely aligned with the backwall.
I think it is within that “range” that most players experience such a wide degree of performance-variance from one hand to the next, and that is why they find it so difficult to zero in on the one correctly-aligned toss-motion that works best on any given table. In other words, they can find the toss-motion range within which they will sometimes have pretty good tosses, yet it’s still too wide of a range to deliver up a satisfyingly high degree of consistent results.
To be fair, you can narrow that range almost immediately if you use my “Mirror, Mirror On The Wall” idea that I first discovered during my 58-day “Gilligan, the Skipper, and the Mad Professor” cruise a number of years back, and subsequently discussed at length in “Shooting Bible – Part Eight”.
The Mirror, Mirror On The Wall idea is obscenely simple:
I first used a full-length mirror so I could see a direct reflection of my entire throwing-motion. I was looking at my overall posture as well as my leg, torso, shoulder/arm/hand and finger alignment.
By looking at how the dice were leaving my hand and flying towards the mirror, I was able to see some things that I obviously hadn’t been able to view as the thrower. It was like having a buddy check how everything was aligned from an oncoming point-of-view.
- In doing so, I realized that certain segments of my arm-extension, dice-release position, and throwing-alignment that I thought were perfect, was just plain cockeyed.
- I discovered that the mere fact that the dice were managing to stay on-axis AT ALL during some of my throws was nothing short of amazing.
- When I saw it in the mirror, I realized that while my arm, wrist, and hand LOOKED flat enough (from my own eyes perspective); when seen from the oncoming mirror position, the dice were quite a bit off-kilter from the horizontal.
- That meant that the dice were leaving my hand uneven to the table surface, and were therefore landing uneven. Like I said, it was a miracle that they were staying on-axis as often as they were.
I immediately realized that if I went through my throwing-motion while standing directly in front of the mirror (without actually releasing the dice), I could determine just how “FLAT” or even the dice were in relation to the flatness of the table-top. In fairness though, that “Mirror, Mirror On The Wall” idea is on the decidedly low-tech side of the toss-alignment solution, and I’ve replaced it with the laser on my at-home table. However, if I have a toss-alignment problem in the casino, sometimes a quick toss-check in front of the large mirrors in the casino washroom will uncover an obvious and easily correctable flaw that wasn’t so obvious when I was looking at it from my own dice-tossing point-of-view instead of the head-on perspective that a mirror offers. The laser-level can help you accomplish the very same thing, but in an even more accurate way. I have found that it is through the use of these small but incredibly effective practice-session ideas that you can quickly elevate your current 50% or 55% on-axis results to 60%, 70% or even higher.
Jeffrey47:
Bushnell™ makes a $40 laser-level that includes a “cross-hair” laser pattern that adds a horizontal dimension into the mix that can be used (in a limited way, as the laser must be adjusted to put the horizontal cross-hair at each practice-range position along the tossing arc) to even more accurately verify flat-to-the-table, square-to-the-backwall positioning. Also, it comes with a hinged base that can be placed right on your shooting station, which eliminates the need for a tripod (or a Rube Goldberg arrangement like I had been using with one of those little $1.99 toy laser pointers to square up my rig).
In the meantime, here’s another home-brew approach that will get you hooked on Maximus’ laser exercises (if the original article in Part Seven of this series already hasn’t). This idea let’s you see just how dramatic a properly-aligned reference line can be before you actually go out and spend your money on a high-tech laser:
- I got a piece of 1/4″ wide elastic band from the household sewing kit (used to create fitted, gathered shirt-sleeve ends and such), but any light-colored string will do.
- One end is attached to the shooting station just behind the starting point of your toss, and the other end is attached up above and beyond the target station at a perfectly-square right-angle to the back wall, and at a height allowing the string to trace approximately along your tossing arc.
- Though you won’t have the laser light shining right on your hand throughout the entire arc; you will have a localized sight-reference line to partly compensate for our oblique (slanted) viewing position. When you see how dramatic your progress with this low-tech version can be, you may soon find yourself racing towards Radio Shack to pick up one or more reasonably priced lasers.
Mad Professor:
I only wish I knew about using the laser in this context a lot sooner.
It paid for itself nearly twenty-fold when I re-played a table where I had traditionally experienced all kinds of backwall alignment trouble. Because of the inordinate length of the table and the unusually high deck-height (combined with a slightly taller rail-height); my toss-alignment was entirely wrong. I had spent years getting inconsistent results that were all over the board, and I was never able to figure out the best table-position and the best shooting-posture and the best toss-motion alignment in order to get the best, most consistent results.
I jury-rigged my at-home table to replicate those conditions; then used the laser to figure out the best shooting-lane and shooting-posture that would produce the most consistent results. That “terrible” table has now turned into a “terrific” money-producer. A table that I normally would have avoided (like many other skilled dice-influencers still do), is now a prolific profit-maker.
Maximus:
I started getting paranoid that I was truly setting the laser in an absolutely straight path so that the line of the laser intersected with the backwall of my practice-rig at a perfect 90-degree angle. This led to several testing-methods to determine just how true the laser was following the path of my toss; or actually, how true my toss-motion was following the properly aligned laser line.
- For that reason, I put a second laser on top of my main laser. That allows me to have a laser reference for the full motion of my toss, right through to my release-point.
- I also like putting the laser parallel to the backwall and setting it to put a downward-slanting line on the wall so it can be used as a reference point for my toss-motion and range, especially in relation to the dice release-point.
Jeffrey47:
The way I’ve aligned the laser to be square to the target station is the same way I’d used a simple laser-pointer to align my rig. With a T-square I marked points on the felt that defined a 90-degree angle from the wall to the FRONT LIP of the target station. This can be done at several different spots, left to right, so we can then set the laser up to define different shooting-lanes of our choosing. You just line up the beam to intersect the front-lip mark and the mark at the base of the wall and it’s then dead-on per the previously made T-square measurements. By the way, the same is done for the shooting station with respect to its orientation with the target table.
Mad Professor:
I like that double laser idea too because it lets you accurately set and target different initial touch-down spots at the far end of the table. It is also a great way to see how “on-line” your dice are flying through the air in relation to the laser reference line that is shining on the backwall.
The more you understand what the dice are doing during all segments of the release-through-final-outcome process; the better able you are to make the necessary refinements and toss-alignment modifications to build a much more consistent toss.
Maximus:
Exactly, I have found that using a second laser on top of the first, while tricky to align, allows you to have a clearly defined laser guide-path for the entire range of your toss-motion, flight-path, initial landing target, and square-to-the-backwall reference point.
Jeffrey47:
The laser’s line is really the only “out there” reference we have that converts to an accurate “in here” sense of the true geometry comprising the 3-D spatial field we toss in. The commonly used lines on the deck of the table (Passline, Don’t Pass, Field box, etc.) create optical-illusion traps for our unwary minds in generating any mechanics based on them. The laser helps us learn and accurately define “square-to-the-wall” in terms of our delivery rather than in terms of deceptive visual references that might appear on a given table.
Also, the laser’s vivid luminescent line etches pretty well into our visual-recall for subsequent practice as we wean ourselves from the laser-device between uses, and therefore it adds a concrete element to the whole idea of visualizing “the toss.” That way, we can now vividly visualize a far more accurate square-to-the-wall line, which properly trains our brain and muscles accordingly, even when the laser is not in use.
Mad Professor:
Yeah, I think it’s that last point that really made a difference in why Maximus’ Laser Practice…Laser Perfection idea had such a dramatic and immediate impact on my results.
- By visually etching the correct toss-alignment motion into my memory, it makes it easily and instantly recallable at the casino tables.
- That is, I know immediately by feel AND visual confirmation if something is off in terms of my entire toss-motion, so I’m not left wondering whether or not it’s me or the table that is causing those wonky off-axis or poor facial-correlation results.
- Instead, I now know to an absolute certainty whether it IS or ISN’T me, and I don’t have to waste time speculating and guessing about it.
- If it is me (or more correctly my toss); then I can quickly realign my toss with total confidence. However if it isn’t me, then I can move quickly to adapt my (already) correctly aligned toss to suit that particular table. In doing so, I don’t get into the whole second-guessing-myself routine that many players unnecessarily fall into when their dice-results to not match their toss-input intentions.
Frankly, it has reduced my adapting-to-a-new-table time by more than half.
Maximus:
For me, the concept behind practicing with such a strict and uncompromising tool like a laser, is so you don’t have to focus and concentrate as much on delivering an arrow-straight, perfectly aligned throw when it comes to playing in the casino.
I go through practice sessions where I use the laser throughout the entire session, whether I am just working on technique, or tracking my throws, or just playing a virtual session; and the laser verifies accuracy on each and every toss. As a result, my in-casino toss is almost always perfectly aligned because everything about it is almost entirely on automatic.
Mad Professor:
Yeah, that’s exactly what I’m talking about. The laser provides tangible evidence and visual confirmation that I’m doing everything correctly on my practice table. When I’m in the casino, my toss-motion is SO automatic that I rarely even have to think about it and I can focus entirely on adapting my toss to that particular table.
Introducing Maximus’ DiceLeveler
Maximus:
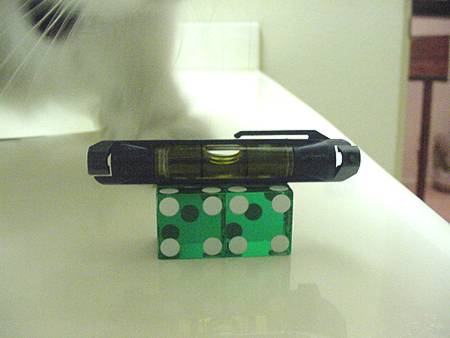
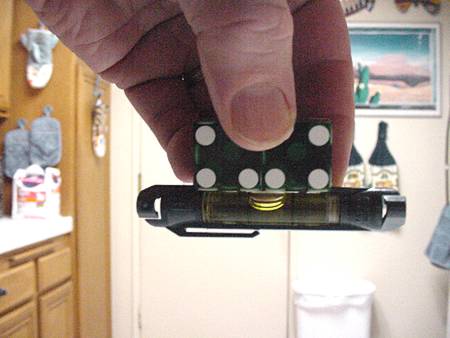
I use the dice-leveler (pictured below) as a tool. Basically I glued the smallest level I could find to a pair of dice that are glued together (à la DiceDoc’s DiceBarrel).

The challenge is obviously in reading the level’s bubble; but if you can, this tool is quite illuminating as far as seeing how level (flat) you keep the dice to as you go through your entire toss-motion.

Mad Professor:
I haven’t yet tried Maximus’ DiceLeveler, but in using the cross-hair (vertical line and horizontal-line) laser that Jeffrey was talking about, I found that I was able to achieve that leveling-effect without having to glue a tiny level onto DiceDoc’s DiceBarrel. However, where I think this tiny glued-level idea could be really effective is with shooters who experience a lot of off-axis sideways hopping, popping, and scattering on their initial-touchdown contact with the table.
In fact, as I look back at the “small increments of toss-motion alignment” exercise that Maximus outlined in Part Seven of this series; I see where the DiceLeveler tool could take a good exercise and make it even better.
Maximus:
I am convinced that extended laser practice offers a very solid opportunity to produce a consistently straight and level throw. I know it has helped me achieve a degree of toss after toss consistency that I didn’t think was even possible.
Mad Professor:
I have to agree with that. I want to thank both Maximus and Jeffrey47 for sharing these additional practice-session uses for the laser-level, as well as unselfishly imparting their keen insights into how they turn their current practice efforts into future dice-influencing profit.
Good Luck & Good Skill at the Tables…and in Life.
Sincerely,
The Mad Professor

